Thursday, September 13, 2012

A Necklace Fit for a Queen (or a Princess, at least...)

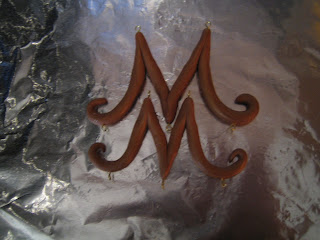
For as long as I can remember having planned my Tudor gown project (I think it started in 2007, perhaps?) I have wanted a necklace like the one Elizabeth I wore in the portrait she gave to Edward before she became queen. It was a double-stranded affair with alternating pearls and gold beads. However, I also loved Anne Boleyn's "B" initial necklace. I always thought it was playful... dare I say flirty? I guess there's something about seeing all of these anonymous portraits, and then you get to hers and see a woman who does not want her name lost in history, and who is proud of her family. An early modern woman who doesn't feel defined by her married name, but who proudly boasts the name she was born with. Maybe I'm projecting here, but I want to explain why this is a personal project for me, and not just a simple reproduction. I really like the idea of what the pendant represents.

Not that Princess Elizabeth's necklace doesn't resonate with me as well; I think it is one of the most compelling portraits of her in existence. She is young, not yet Queen, but looks incredibly bright. And it was a tender gift to a brother she loved and would soon lose to death.

Princess Elizabeth, thank you Elizabethan Portraits!


And here's one of the Boleyn portraits featuring the pendant. There are several; some, including this one, may be posthumous copies.


Once again, thank you Elizabethan Portraits! 

I used glass beads and gold-plated beads to make the necklace. I made two strands and attached both strands to the same clasp, which had loops on it to accommodate up to three strands. The clasp is shaped like a little Tudor rose! I've been hanging onto it for years in anticipation of this project.


As you can see, I do need to get better at attaching my strands to the clasp. I am very bad at looping the small bits of stringing material through the loops on the clasp, and so I ended up with more un-beaded stringing material than I wanted, and then I had a couple of dodgy goes with the crimps, so I added a second one just in case....

 I threaded the glass pearls and gold beads on two strands that I measured to the length I wanted them. I believe the glass pearls are 8 mm and the gold beads are 6 mm. Both are from Fire Mountain Gems.  I think I may have made the choker length a little longer than ideal, but oh well. I think it is probably close enough that I'll be happy with it.

The two-strand necklace before the pendant was attached.
For my initial pendant, I used polymer clay that I shaped with my hands (ugh, hello fingerprints and fingernail indentations!). If I were to do this again (in fact, I might), I would definitely research some tools to help with this part of the procedure. For now, I think it was a good start, and since I'm in a bit of a hurry with this project, my prototype will do for now. I cut some headpins and pressed them into the clay before I baked it; the ones on top were attached to jump rings and attached to the shorter strand of my necklace, and the ones on the bottom will eventually be used to attach some dangly beads, but it turns out teardrop shaped red faceted glass or glass pearls are hard to find locally... I'll have to place an order online.

I made two clay pendants; the first one was much larger than I wanted. The second isn't too much smaller, but it's enough of a change that it looks a lot better. I don't think with my current molding skills, I'd be able to get one much smaller than what I have! I'll have to practice some more.


After it was baked, I painted the front and sides of the pendant with some gold leaf paint that had scary warnings on it. After reading the warnings thoroughly, I decided it was best to leave the backside (which will lay against my skin) unpainted.

The metallic paint I used.
 Here's the pendant right after I painted it:


And here it is attached to the necklace:


I've been working on my bodice... I may finally have some pictures of garments on my body soon! I've got a lot of mostly finished pieces, but once I have the bodice constructed and the skirt attached, I'll be able to hem my petticoat and make my smock without worrying about its neckline not matching the bodice neckline. I am probably over thinking all of this, but I'm not used to making quite so many pieces that have to work in tandem with each other. I'd rather be overly cautious until I'm omre familiar with the process.

Wednesday, August 22, 2012

Plugging Along

Well, I am still working on this gosh-darned costume! This was a very ambitious project for me, and while I don't regret embarking on it (on the contrary, I enjoy the challenge; it is nice to have a project that isn't done after a month or six weeks of work), I do feel rather down when I hit a snag. I was going pretty quickly for a couple of weeks there, but I have hit a few difficult sections and it isn't coming along as quickly. So, where exactly am I in this project? Good question!

I've finished my corset and my farthingale. I have a bumroll hiding somewhere. I've also made a petticoat, but  I don't want to hem that or add the fastening at the waist until I know exactly where on my waist I want it to sit, and how long my overgown will be. I have been making and ripping apart draft after draft of the bodice.

Ah, the bodice! Anybody out there reading this with more fitting/ tailoring experience than me? I've been on my own through this process with only my boyfriend to help provide an extra pair of hands, but he doesn't have any sewing expertise. The bodice fits relatively well, but of course you never can tell until it's made up with lining and interlining, and the seam allowances are eliminated (I-- naively-- added them a draft or two ago) and it's all laced up. The sleeves are what are giving me fits. I used Simplicity's sleeve pattern, since it looked relatively similar to the sleeve in The Tudor Tailor, it was already scaled up, and I am supremely lazy. As I type this out I realize why I may be having trouble: I used a sleeve several sizes smaller than the bodice back size, and the bodice front is not from the same pattern. Besides that, I changed up the strap quite a bit from the original pattern, so the armscye has very little in the way of a relationship with the sleeve.

The issue is that I'm getting these horrible wrinkles near the armpit, and the sleeve itself is really frumpy looking. I pinned out the folds and re-cut the sleeve with those changes, but I am still really unhappy with all of the gathers. My options seem to be to cut and slash the sleeve so the sleeve head isn't as full, to shave some width off at either side, or to try sizing the sleeve down significantly and cutting it on the bias rather than relying on gathers. I am really reluctant to do that since there will be so much weight on the sleeves; not only will the hanging portion of the sleeve be attached here, but I'll also be lacing the foresleeves onto this structure. That's a lot of weight to support, and I'm nervous that if I cut it on the bias, the sleeve will eventually deform. So I guess I keep fiddling with it until it looks nice.

I have to say, I know I should get the mock up to look perfect, but I am so tempted to just jump in and hope for the best. I may just be at the point where I don't have the skills to make the sleeves perfect, and it may take a few alterations once the darned thing is made up in the fashion fabric (which, invariably, will behave incredibly differently).

Aside from working on the bodice, I also bought some fabric for the foresleeves and forepart that I intend to dye. It is currently light gold; I would like for it to be deep red. The boyfriend nixed using our beautiful new washing machine to dye it with, so I am reduced to looking for a big pot that can forevermore be my dyeing pot and I guess I'll be trying to stuff some ungodly amount of fabric into a large vessel on top of the stove. I still haven't decided if I should just use Rit dye (it's easy and they have recipes for colors online) or iDye from Dharma Trading Company (which will probably be a "nicer" dye, but I have to order it online, I'll have to experiment with mixing the colors, etc...). I am probably over thinking this. I should probably just go down to Jo-Ann and buy some dye.

Tuesday, August 14, 2012

Progress!

I am still sewing away! No pictures today, unfortunately; I've been working on a hodgepodge of things. I thought I would have my farthingale done by today, but unfortunately the vinyl tubing I bought to use as the hoops isn't holding its shape. I'd heard that some costumers had luck with it, and I thought it might be an inexpensive way to stiffen my first farthingale (I am anticipating making a nicer/ improved one at some point in the future...), but no dice. That's ok; I have some hoop steel, so I am planning on switching out two of my six hoops for the steel, and we'll see if that fixes it. If not, I'll keep on replacing the tubing with steel until it holds its shape.

I've also started my petticoat. Not very exciting; I used the farthingale pattern, plus widened the gores slightly and angled the center front and center back panels to get a fuller skirt than the farthingale has. That way I don't have to worry about it fitting over the farthingale, and I'll have a little bit of extra fabric to help conceal the hoops. I am planning on pinning my forepart to this petticoat, but we'll see; I may need to think of a "sturdier" solution.

Finally, I have started work on the bodice pattern. I am using the front half of my corset pattern, which I modified pretty severely to get the bodice shape that I wanted. However, as the corset pattern has no back or straps, I decided to use the back of the Simplicity Tudor bodice pattern as a starting point, and I kind of Frankensteined the two together, using the shape of the Tudor Tailor pattern pieces as a guide. The first mock up fit pretty well, and I was able to further modify the shape of the pattern pieces. I am on my second mock up now, and I believe if I can tweak the neckline shape in the back and perfect the shape of the armscye, I'll have a working pattern! Once I get to that point, my plan is to start fiddling with the sleeve pattern to make sure that the neckline will be the shape I want once the sleeves are interacting with it. Unfortunately, I know that the weight of the real sleeves and skirts will mess with everything, I just don't have a good idea of how much... I've been tugging on the bottom of the bodice like crazy and hoping that will at least give me an idea of how to compensate.

I've only tried on my corset twice, but so far I am liking it... It is really comfortable, which I hope means I got the fit right. I like the cable ties as a boning material as well; they are nicely flexible, but hold firmly enough for my standards. I would use them again in a heartbeat, although I recognize that they may not be the best choice for every project. That being said, I don't regret using them in this project... Yet! I'll reserve my final judgement until after the corset has been worn more!

Friday, August 10, 2012

Farthingale: Part 2

When I was approaching my farthingale project, I realized there wasn't a whole lot of information regarding Simplicity's Tudor Underpinning pattern (number 2621). So, I decided I'd be sure to try to take as many photographs as I could remember to, and to share my experiences with it.

For a more involved idea of my vision, please see my previous post. The short version is that I was really intimidated by the idea of making a farthingale, and so I decided to use Simplicity 2621 as the base for my farthingale, with the size of the hoops dictated by Melissa of www.sempstress.org's recommendations, based on her research on Alcega's period pattern layout for farthingales. That's a bad sentence. Basically, it is my understanding that I can reproduce the angle of Alcega's farthingale by using hoops of the lengths she has calculated, whether or not the waist and length of the farthingale match his original. There. The chart is here, if you'd like to have a look; she does a much better job of explaining what this is all about than I do.

You have to understand two things about me for the rest of this to make sense: I am really lazy when it comes to things people won't see (sure, let's just say it's only with those pieces...) but I also obsess unhealthily about the best way to do things, and getting the right silhouette to things. This means I am almost always working at cross-purposes, and this leads to all sorts of bad mix-ups that could be avoided by either adhering to the "quick and dirty" way or the "right" way of doing things, but usually works out in the end.

So, to start with, I found the three pattern pieces that make up the Simplicity pattern; unlike Alcega's farthingale pattern, which includes two front gores and two back gores, you cut four of the same gore in Simplicity's pattern. Ok, I can deal with this. It's a hoop skirt, I don't much care where the seams are (ok yes I do, I like how the Alcega farthingale puts more of the bulk in the back; but I've made my peace with this). As long as the angle is accurate to the Alcega pattern, I figure that will get me close enough. I immediately tossed aside the third pattern piece, which was the one for the waistband. Frankly, patterns for waistbands confuse me, and I always end up winging that part.

I added length to the pattern because when I held the front/back piece up to me, it seemed awfully short; because I ended up adding a bit of length through my waistband method and hemming method, I ended up cutting off all but about one inch of that extra length. For reference, I am not a tall girl; I am just under 5'4", with a waist-to-floor measurement of about 41" (give or take an inch for user error here), and I knew I would need an extra inch or two of length for the flare of the skirt. If you are making up this pattern, I highly recommend measuring and just making sure you have enough length to work with.

As for the sizing, I fell on the border of the 20 and 22 measurements, but chose to cut on the 20 line because (1) I didn't want extra bulk at the waist, and I knew this had plenty of ease to get over my hips and (2) I knew my hoops would be smaller than those called for by the pattern, so I really didn't need all of the width that had been drafted into Simplicity's pattern. The pattern called for four yards of fabric, and that's how much I used. Once again, I looked at the suggested pattern layout, shrugged my shoulders, and then did it my way. What was my way? Well, my synthetic taffeta was 50 inches wide, and so I was able to fit the gores butted up against one another to make a rectangle (the pattern was flipped with the wrong side of the paper up so it would fit this way; it helped that I had fabric that didn't have an obvious right side). I then used a yardstick and tailors chalk to mark my new cutting line that at the hem that would give me some more length, following the curve of the original hem line. The front and back are the same piece, cut on the fold. I folded my fabric in half with the selvage touching (like you usually do when you lay out patterns) to make my fold, then flipped it from cut edge to cut edge so I could cut both the front and the back on the fold at the same time. I know, I told you I was pretty lazy; this worked because my fabric was really thin, and I was very careful in how I folded it.

Then I sewed it up the way the pattern instructed me to. Once again, it was really nice having fabric with an identical "right" and "wrong" side, especially because of my creative cutting layout. I ended up with this:


I know, the front and back are shorter than the gores; this is because when I folded my fabric, I accidentally forgot to leave enough space for all of the extra length I'd originally added. I started cutting at the top and didn't remember to add the length until I got to the bottom. I think I was just too excited from what I thought was a clever way to cut both pieces out at the same time. At any rate, I added as much length as I could and called it good, knowing I'd been REALLY generous with my original addition.

Hey, I never recommended you do things my way; I'm just telling you how I did it.

From here, I stepped into it and eyeballed where I wanted the hem; I was aiming for it to hit my instep. I know, this is risky business, but I was by myself and don't really know anyone in the area who can sew, anyway; I love my boyfriend, but marking hems really isn't his forte. After I figured out how much fabric I needed to remove from the hem in the center front, I measured how much I wanted to keep, and with that number, measured down from the waist all around the skirt, using the pattern pieces to trace the shape of the curve of the hem in tailor's chalk, and then I cut! To be clear, I carefully laid it down just as you see it, with the front and back waist and hem lined up, and then just cut straight across the folded skirt, rather than trying to go around the entire circle. I'm no good at that, and without a helper, that's get tricky. I'll let you know once I finish inserting the hoops if I think this made the hem wonky; I was hoping that by using the curve of the pattern as a guide and measuring from the waist carefully, I'd get the right curve. So far, it looks alright.

I hadn't yet decided what to do about the waistband; I was really tempted to just fold over the top edge twice and do a self-casing for a drawstring, but I thought that would end up looking awful, in addition to taking too much of the length up. Then I thought about sandwiching the fabric between two pieces of ribbon and using the ribbon as the casing, but that would be very bulky. I finally just measured the top edge of the skirt and made a rectangle that long that was 4.5" wide. I ironed each raw edge over twice so no raw edges were showing, did the same on the end, and then folded the entire thing in half and ironed in that crease. To save some time, and because I hate threading drawstrings through casings, I pinned my ribbon drawstring into the waistband, since I knew I would have plenty of room on the bottom of the  Finally, I pinned it to the raw edge of the skirt, sandwiching the raw top edge in between the halves of the waistband. Then I sewed! Yes, this left a row of stitches on the front edge. No, it is not the most attractive waistband I have ever in my life seen. But it was fast, easy, and this won't show under my clothing. It looks neat, and that is all I was going for; I just want this to come out looking neat and solidly constructed. Or at least, something approximating that...

The ribbon pinned into the waistband 

I just folded the edges so that the raw edges were enclosed

Here's the opening; I folded the edges under twice to enclose the raw edge and sewed it in one go, pivoting at the bottom. For all of you who also follow my beauty blog, this is why I always wear nail polish; my poor discolored, wonky nails! 

Here's where the two halves of the waistband meet up on the inside

Another image of the opening at the waistband from the inside; I folded the open edge of the skirt under and sandwiched it like that between the waistband at the top edge. 


The attached waistband! And yes, the drawstring works... I didn't sew over it! 
I don't have any pictures for the next step, but that was marking the lines for the hoop casings. I got the pattern out again and used it to mark across the front and back of the skirt with tailors chalk. I just kind of scooted the appropriate edge of the appropriate pattern piece across the front and back, making sure to keep the angle from top to bottom align as much as I could to approximate the curve. Looking back, that may have been fruitless; those things kept wanting to sew straight as I put them through the machine. Oh well, I guess I'm glad I tried. The only thing I changed was that I played around with the bottom, adding a hoop between the hem-hoop and the next to the bottom hoop. To do this, I scooted the next-to-the-bottom hoop up two inches, and then put another hoop between that one and the base. I just wanted this thing to be a little sturdier, because I know my skirts are going to be very heavy. I will have six hoops in my farthingale, instead of the five that Simplicity suggests.  After these lines were marked in chalk, I pinned the ribbon down, making sure to place the pins in the right direction to take them out as I sewed. I only did a couple of casings at a time, because I didn't want to be wrestling this thing through the machine and getting stabbed by pins from another casing. Each casing is one continuous piece of ribbon that I left open on the side that the drawstring ties on; I actually ran out of ribbon when I got to my last casing, the middle one. That is why there is a big gap between the ribbons in the following photos. I will have ended up using 4 spools of Offray 7/8 inch grosgrain ribbon from JoAnn Fabric; I was able to get all but the middle casing out of three spools.

A tip on pinning the ribbon on; flat things and curves don't get along. Grosgrain ribbon does not like to be sewn to something that is bigger on the bottom edge than on the top edge. I made my peace with making tucks where I had to, and I found that holding my hand under where I was pinning, so that the ribbon and the fabric both stretched over a convex curve, really helped ease the process along. Likewise, as I sewed, I tried to hold the fabric relatively taught with a bit of a downwards bend over the edge of the machine to mimic this convex curve. If that makes any sense. The ribbon still manged to migrate a bit during the process, but it went relatively smoothly. I think there might just be a learning curve (heh, get it? get it?) for making these darn things. At any rate, here are some more photos of this process.

most of the casings sewn, one pinned; not perfectly straight, but I think this will do. They migrated as I sewed them! 

The edges I left open

I used the hemming method advocated on Sempstress' farthingale tutorialthe ribbon hem . This hem appealed to me because it is nice and finished, and it forms the casing for your bottom hoop.There is a very good tutorial if you follow the link above, which is what I used, but here are the basics. I put the top edge of the ribbon near the raw edge of the fabric on the wrong side, since I wanted to keep the hem fairly long, so that the better part of the ribbon hung over the edge of the skirt, and I sewed close to the edge of the ribbon.

Here it is sewn down and ironed; I forgot to take a picture when it was just pinned, so I unfolded it to show you what it looks like. For reference, this is the wrong side of the skirt; the ribbon covers the edge of the fabric and hangs over the edge.


After you've sewn it from the wrong side, you iron it over to the right side, so the raw edge of your hem ends up encased by the ribbon. I ironed a bit of the fashion fabric forward because it laid nice and flat this way; the curve of the hem was on the bias and ironed out nicely, and I thought it looked pretty.

Here is the ribbon ironed to the front, before I sewed the top edge down.


Then you just sew the free edge of the ribbon down to your fashion fabric from the right side, right along the edge. I didn't even need to pin it after I ironed it, and it went smoothly. Once again, I left a bit of a gap on the side of the skirt for the hoop to go into.

That's all I've done so far, since I need to get more ribbon and a boning material for the hoops, but I will keep you guys updated on my progress. Expect a more concise summary on my thoughts on the pattern once I finish the farthingale!

Thursday, August 9, 2012

Farthingale Construction: Part 1

Hi guys! Sorry I haven't been very good at updating my progress. I've finished my corset, but haven't worked up the nerve to try it on yet! I just wanted to ride on the high of finishing something! I'll save the rest of the corset project for another post... But for now, I'll dive right into the farthingale.

I did way more research than I probably needed to on the farthingale, but I'm compulsive like that. I looked at paintings and stared at skirt diameters, questioned whether or not I need one (I still haven't decided what year my finished gown will most closely reflect, but something between 1530-1540 most likely; right in the transition from no-farthingale to likely-farthingale), and to be honest I probably could have gone either way. To be really honest, I may still wear my gown without a farthingale, depending on what it all looks like together. However, I reeaaaally didn't want to be tripping over my skirts and getting layers of skirt wrapped around my leg, and my fabric is so pretty and patterned that I wanted some of that to be held out to show off the fabric, so farthingale it was!

From there, I stared at the Alcega pattern layout until it made sense, and then thought about it some more until it didn't make any sense anymore, and decided not to use it for the draft of the skirt. I have more copies of Simplicity's Tudor Underpinnings set (pattern number 2621) than you can shake a stick at, and this is going to be under my clothes, and honestly, I was really, really scared of making my farthingale, so I figured I'd just use the pattern this time around. But of course, being the way I am, I can't just follow the pattern. That's too easy. Also too boring? My brain doesn't like pattern instructions anyway; I mostly only ever use the pattern pieces, referring to the directions only for "advice".

I found www.sempstress.org indispensable. Melissa's way of explaining things makes sense to me, and she tends to write on the subjects I need help on. So, if you're reading this... THANK YOU. THANK YOU SO MUCH. She used all sorts of math-magic to figure out the angle that the sides of the Alcega farthingale are, and also to tell you what length your hoops should be if you want to maintain that angle, but on whatever scale your farthingale happens to be. The handy dandy chart is located here.

I originally planned on using one of those horrible polyester taffetas in a mauvey-flesh tone with dark brown grosgrain ribbon for the casings, but after I ironed it, I realized I couldn't condemn it to live underneath other skirts. The color looked gorgeous against my skin and hair, so I set it aside (and promptly ran back to JoAnn and bought the 1.75 yards left on the bolt- it was a flat-fold clearance fabric) and pulled out a DIFFERENT horrible polyester taffeta. This one was blue shot with pink that I'd intended to use as a skirt for an 18th century shepherdess costume based on a few Fragonard paintings. I remember it being very inexpensive, and it was much brighter than I remembered it being when I bought it; honestly I couldn't see myself using it for anything else. I ended up still using the kind of clashy brown ribbon (it's a yellow-brown; not a rich chocolate brown with a red undertone). You know, it doesn't look as bad as I thought it was going to! The brown looks pretty bold against the blue.

Unfortunately, it really does clash against my corset. This is a bright blue shot with bubblegum pink; the corset is a kind of light indigo shot with gold.

Ack! 

Oh well. It could be worse, and beggars can't be choosers. As long as both pieces end up being functional, I can't complain.

So, there you have it: the plan, outlined. Of course, like I said, I can never leave well enough alone; aside from changing the fabric last minute, I also messed with the pattern. That being said, I couldn't for the life of me find a good review/ tutorial of Simplicity's farthingale from the 2621 set, and so I decided to keep track of what my progress and write a little bit about it, which takes us to Part 2.

Thursday, July 19, 2012

Binding...

I have spent the last two days finishing up binding my corset, and boy, my finger is so sore! I feel like if I could get into the habit of using a thimble, it would be a good thing. Unfortunately, they drive me nuts and make me feel so clumsy!

That being said, I've got the top and bottom of my corset completely bound, and my next step will be my lacing holes; once I am sure that I will not have to take in or extend the center back of the corset, I'll make my lacing holes and then finish binding the center back edges of the garment.

Does anybody have any good tips for making my lacing holes? I am really terrible at hand-bound eyelet holes. Despite practice, they take me forever, don't look particularly good, and don't tend to be very consistent. I'd be willing to put in the time and effort for an outside layer, but probably not for an underpinning, especially when I am hoping to finish up the entire outfit by October.

So, back to my original question. Any good, sturdy lacing hole tips? I've used the dinky Dritz hand-held grommet punch, and I won't take that thing near this corset. The grommets always pull out. I've also used Laci's ginormous grommet setting machine, but I don't think I can justify the trip down to their store between gas prices, my car being on the fritz, and the time crunch I've been under in general lately. I'd much rather put the gas/toll money towards investing in a good tool that I can use in the future.

Let me know if you've come across something that works really well!

Thursday, June 21, 2012

Life Gets in the Way

I can't believe it's been so long since I've posted about my progress here! I still haven't finished binding my corset or making the lacing holes, and I haven't moved forward with any of the other sewing I've wanted to do, either. I've been occupied with schoolwork, and I've felt guilty spending too much time with sewing. I've also been busy with house guests, and I haven't wanted to make a mess in the house while people are over. Hopefully I'll get my sewing room set up over the next month or so after this next wave of guests departs, and then I'll be able to make a huge mess and not worry about it!

Anyway, I just wanted to check in on the blog and let you all know that I am still thinking about my sewing projects, even if I haven't had a chance to make much progress on them...

Tuesday, April 24, 2012

Corset Update

Don't worry, I'm still sewing! I know it's been a little while since I've posted, and I have been taking an admittedly leisurely pace with this project, but I have been steadily moving forward with it. I have been writing about my progress much more frequently in a personal journal, and I think I thought I'd posted some of that here... Oops!

Since I wrote last, I finalized my corset draft; I decided not to add a curve to the front so that it would work for a bigger variety of outer garments, and give a more authentic flat-fronted look. I cut the corset all in one piece with the center front of the pattern on the straight of grain. I'm not wholly confident that this was the best course of action, but it's too late now. All of my shaping (what little of it there is...) is done at the center back, which is my lacing edge. I've left a bit of a gap to lace with, so that I can adjust it there if need be. However, I noticed (after cutting, of course) that by the time the pattern curves around, the back edge is on the bias.

Oops.

Anyway, I'm going to move forward with this and if it doesn't work out, then I'll use what I've learned and start again. I hate failing, but if I've learned anything, it's that sewing is a lot of trial and error. And I like to think that I'm good at learning from my mistakes!

So that's what happened with the pattern. For the fabric, I used a base of coutil, an inner layer of cotton broadcloth, and an outer layer of very lightweight blue and gold shot silk from an old skirt I had as a child. I couldn't bring myself to get rid of it when I outgrew it because the fabric was so pretty, so I've been hanging onto it for going on 12 or 13 years now! I picked it apart, and managed to get the entire corset with only one seam on it, which I placed on the center front so it wouldn't be too random. I marked the boning channels on the coutil in pencil, making up the placement as I went along (I also had a look at the Elizabethan Costuming Site's corset page). Then, I hand basted all three layers together around the edges, and sewed the boning channels on my machine from top to bottom. For some reason, the silk layer now looks shorter on the center front than the other layers, but the shifting was otherwise minimal. I had to clip the basting threads at the bottom as I went because of the shifting, and I think it helped, but it did not solve the problem completely. I haven't decided yet if I am going to trim the bottom point to meet the silk, or if I am going to try to cover up the gap with bias tape, since that layer is merely cosmetic; the boning will go between the coutil and the cotton.

Speaking of boning, I think I may try to use cable ties to bone this corset. I've only ever used steel, Rigilene and featherweight boning before. But I hate having to mail order steel, I hate that you can't order it in half inch measures, and I hate trying to cut it and finish the ends. If cable ties work, that would be a great solution, since they're easily accessible, easily cut, and inexpensive. Well, we'll see. I am fickle; I may end up using steel after all.

Here's what I've got so far:


There's all of my leftover steel bones from past projects; of course, there's only about four that would actually work for this corset. Isn't that how it always goes? You can also see the bit of white fabric on the bottom from where the upper layer shifted. As of yet, it is strapless, but I plan on making straps separately that can be laced on, if I decide they'd help with the fit or comfort. It has tabs as well, but I haven't cut them yet; the boning will run the length of the tabs. 

As for my next project... I found an old farthingale that I started a few years (and a few pounds...) ago. It's put together and the channels for the hoops are pinned on, but not sewn down. However, if I want to make this work, I'll have to add a bi to the waist so it won't be uncomfortable. It fits now, but just barely, and I don't know about over a corset... It also looks like it's too short! I don't think I've gotten taller, but I wonder if I was being overly cautious the first time around about giving myself enough clearance to walk in it comfortably. I may have to add a band at the bottom with another hoop and some pleats. 

I can't wait to finally have a finished, wearable garment to show you guys! 

Wednesday, April 11, 2012

Bits and Bobs

Hi guys!

I guess I don't have any "real" progress today, but I've been enjoying blogging about my sewing, as I feel like it helps motivate me. I can feel my creative side unfurling as I focus on this one project, and other projects seem to be coming together as well. For instance, I'm not feeling so hopeless about school anymore, even though the timeline I'm looking at isn't making me happy. In addition, I'm also starting to get some good ideas for my house!

Some of you may know that my boyfriend and I moved into a house together in October. Neither one of us has ever had our own home in our adult lives; we've both gone from apartment to apartment, moving every year or two. Getting settled in to something bigger than a shoebox is a little bit different, and a little bit chaotic, but definitely in a good way. However, we're coming up on six months in the house, and while we've made great strides in that time, the unpacking and pretty-ifying slowed way down when we had guests here throughout the holidays, and hasn't really picked up again. It's been difficult to find all of the things that we need, as we still have so many unpacked boxes, and our hall closet, half our garage, my soon-to-be sewing room, and his grandmother's garage are all cluttered with bags and boxes from the move. I wouldn't say I feel guilty about the clutter, per se, but I am anxious to see some tangible movement in the house again. Where am I going with this? What does this have to do with my sewing project?

Well, two things, really. The first being we went over to his grandmother's house yesterday, and I found a ton of fabric and notions. Very exciting! I found a big box of boning and ribbon and other odds and ends from Lacis, in addition to plastic bins full of fabric. I even found an entire gown that had gone missing! It was originally a Vintage Vogue pattern (1931, I want to say?) I threw together in high school after my sewing teacher gave me the cut pieces, and that was last worn in 2008 or 2009 to a Firefly-themed event. My other big find was a length of green fabric that I've been missing for around 7 years now! I had used it as a sash on my windows when I first got it, and after I changed my curtains it mysteriously disappeared. Mystery solved; it had been hiding out in a box in my dad's storage unit that he passed along to me in my last move without me really realizing what was in it. It's a bright kelly green, and I'd been hoping to find it to use with some brown velvet I have to make an early Tudor. However, now that I see it again, I think it may be TOO bright. However, it claims to be silk; I'll have to double check (if it is silk, it's a weave I don't recognize; papery, but lacking the luster crinkle that taffeta has; thicker than a crepe de chine), but if it is, it should be fairly easy to dye.

The other reason I bring up the house is that all of this sewing has opened up the creative floodgates for decorating the house, too. Right now I am obsessed with putting in a floor-to-ceiling bookshelf in the office, along with a rolly library ladder. We have high, sloped ceilings, and I think tall bookshelves would be gorgeous and dramatic; I'm going for a whimsical-fussy look in there, with a bit of an Asian-obsessed-Victorian feel. My boyfriend is a Buddhist, and has a small altar set up in there. I don't want to detract from his love of Asian-inspired furniture, but I think it would marry beautifully with the Victorian aesthetic I'm picturing. Whistler's Peacock Room, anyone? If I could find a lush Persian rug in a deep pine green to compliment the current taupe and peacock green walls, I'd be in heaven. My other current obsession for the house is Cole & Sons Woods wallpaper. Our great room is a warm taupe grey that leans dusty lavender in warmer light, and although it's a beautiful color, the room is a bit plain. I'm trying to gradually incorporate pops of red into the space, and originally thought that painting a small inset wall behind our dining room table red would be nice. It would be beautiful, but perhaps too bold for my boyfriend's taste. Lately, I've been thinking that keeping it monochromatic by putting Woods on that wall might be a way to bring some humor into the space without detracting from the "elegant" look we've been favoring.

None of this is going to happen right away, but it's fun to think about these things; hopefully by the time we have a little bit of extra money to throw at these things, we'll know exactly what we want and be able to spend it wisely on a few key elements to breathe a bit of strong personality into the space.

As for the corset... I cut it out of some cheap canvas, only to discover it doesn't hold in the side-boobs the way it should after it squishes them from the front. I was thinking after yesterday's post that I never thought I'd find myself talking so much about my breasts on the internet... Oh well, c'est la vie, and it's a bit of a necessity if I want to blog honestly about the process of developing a corset pattern. I feel like everyone else takes some measurements, drafts a pattern, makes a minor adjustment or two, and voila! There's a corset. That hasn't been my experience with it, but I'm not complaining. I actually quite enjoy the process! Wish me luck; if all goes as planned, in the next week or so I should have a corset finished enough that I can try it on and take a few pictures! My goal is to finish the pattern today, and start putting it together tomorrow so that I can place an order for corset steel before the weekend. Then I can move on to working on the smock or farthingale while I wait for those last supplies to arrive. Good plan, right? We'll see what actually happens...

Tuesday, April 10, 2012

Drafting Success!

I drafted a corset pattern that I think will work for me! After holding multiple paperboard patterns up to myself and shaving off corners and building up curves, I've finally got something that looks like it will be a good fit. However, before I make a mock-up, I have to decide if I want to add a bit of a curve to the front to support my bust. Originally I took for granted that I would do this, but as I was holding a piece of rather stiff paperboard up to myself, it occurred to me that I may not have to sacrifice the Tudor-style flat front for support. I have had luck with lacing myself very tightly into flat-front bodices before, although I will admit I often had to re-adjust the Ladies on the sly a couple of times throughout the day. A bit of a dip beneath the bust would probably help avoid this problem, but I am concerned about not have as "accurate" a silhouette, and about having to match that curve on every gown I make from here on out to wear over this foundation garment. That being said, there is evidence of a bit of shaping around the bust in the period I am immediately focusing on (1530's-1540's), at least in Holbein's work. And I don't know why, but I trust him more than other painters of the period; he seems to pay more attention to portraying things as they were, rather than in an idealized manner. His attention to detail leads me to believe that this shaping around the bust is accurate to how the clothing fits, although this is all purely speculation. It doesn't *really* tell us anything, other than that he painted women this way.

FYI, I don't own any of these portraits; I've found them online. These are all by Hans Holbein.

Jane Seymour: See the shading around the bust and the curve at the side of the bodice? 

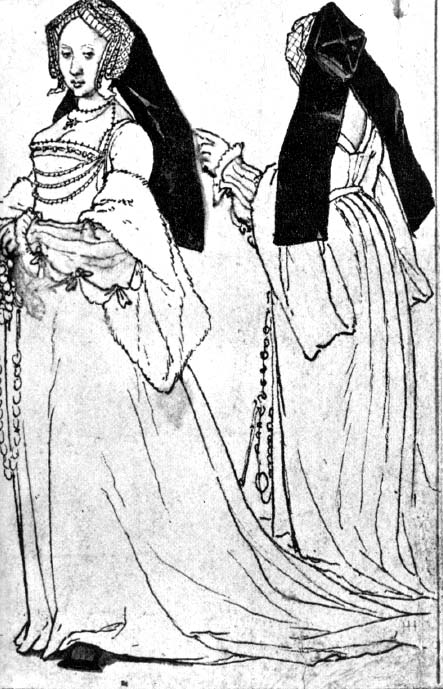
Another curve at the bust, courtesy of Holbein 
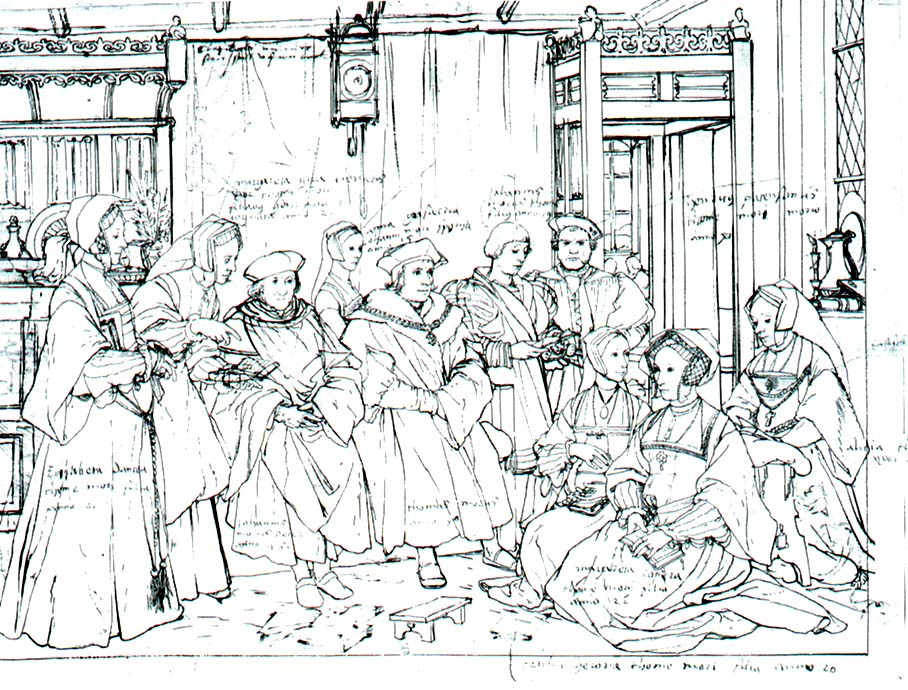
Sketch of Thomas More's Family: Check out the women on the right


This one doesn't show the garment following the curve of the bust, but it does show some major cleavage and a lower neckline, which is helpful in its own right; boobs acted the same when compressed then as they do now! Because I'm telling you, there's no way you're putting me in a tight, flat-front corset and getting demure Anne Boleyn decolletage 
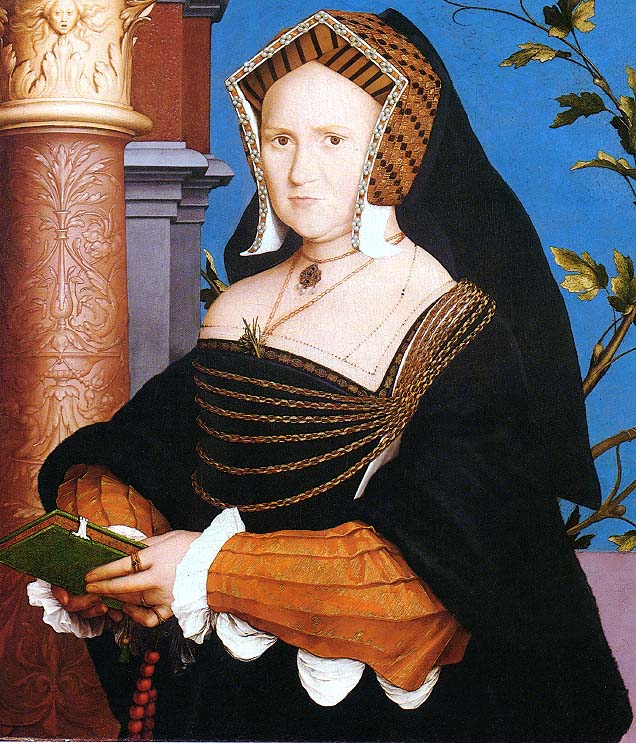
Lady Guildford: More evidence that the ample cleavage produced by a flat-front bodice is natural and not entirely "non-period". Although I'm still against the Ren-Faire bodice "affected" cleavage effect. 

Maybe I am getting too caught up on the "accurate silhouette" part of things; in fact, in lots of Holbein's work from the 1530's, you'll see shading and highlighting suggesting a swell for the bust, and 3/4 profile works often demonstrate a dip between the swell of the belly and swell of the breasts, especially on non-Royal sitters and fuller figured women (take a look at the images above). It's hard to say whether this is because a pair of bodies was fitted to the wearer's shape, or because there was no foundation garment at this point in time, and the stiffened bodice was not enough to rigidly re-shape the sitter's curves. At any rate, I hope to make this "catch-all" corset (it's not really accurate to any of the existing pairs of bodies we have from the end of the sixteenth century, much less any of the speculative foundation garments that are considered most likely for the Henrician period) work all the way up through the 1570's, and that bosomy swell tends to disappear from portraits around the 1540's, as far as I can tell. Looking at these grouped together, I tend to think that women who were wearing highly stiffened bodices ended up with a flat fronted bodices and compressed bosoms that moved upwards, producing cleavage, and that the women with the curvier fronts that we see are not wearing any sort of highly stiffened foundation garments, just a couple of thick layers of fabric for their kirtle and gown.

So, where does this leave me? I think I may try mocking up a flat-front corset and seeing if that is feasible; I can't stand the idea of having a fold under my bust on gowns with no center front shaping seam, and I really want to be able to use this corset for more than just the one gown I am making along with it. That being said, if I don't have luck with that design, I don't think I will feel guilty if I add a little bit of an inward curve to bring the corset back against the rib cage beneath the bust to help support it.

What do you guys think? Anyone out there tried this? By the way, I should probably add that I am working with Sempstress' Curved Front Corset as my model for the curved front I have been referring to. She seems to have had very flattering, comfortable results with it.

Sunday, April 8, 2012

Back to Drafting!

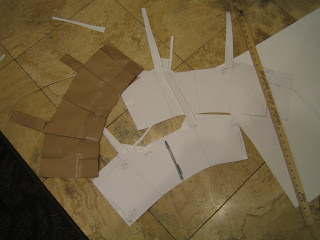
This is what my living room floor looks like right now:


I'm back at it! Boy, it's been a few years since I've done any major pattern drafting... I am out of practice! Unfortunately, I'm also out of practice taking my measurements, so this has taken a bit more adjusting than I remember! Some of the problem is that I am also paranoid about making a corset that doesn't leave scabs on my hips. Been there, done that... I'd rather avoid it this time around if I can.

I've learned a few surprising things about my body through this process. Specifically, that it does not look the way I think it looks. For instance, I knew I had a high waist, but seriously? Seriously? That is a SHORT pattern. Also, putting my bust point on the pattern where I "should" (read: where I measured it) left me with a way-too-low-even-for-a-basic-pattern-block neckline. Is this a sign that I need to get a better bra? Well, I already knew that...

It's always amazing to me that you can take a few measurements and just draw yourself something that fits your body. I'm not particularly good at math, so maybe that's where some of the mysticism comes in. Obviously, I can find my way around basic geometry (otherwise I wouldn't be able to do this at all), but it's still a bit of a mystery to me how it works; I just follow the directions and figure it out as I go. Incidentally, if you'd like to figure out how to make your very own basic conic block as a starting point for a Tudor corset pattern, I highly recommend Sempstress' instructions. This website has been invaluable for drafting basic Tudor pieces.

Just FYI, in the photograph above, the paper bag was my starting point, the middle piece represents the block after a few changes were made, and the bottom pattern is what I am actually planning on altering into something of a corset shape (add tabs, adjust the straps, reduce the bust), cutting out, and trying on. Darn it, I don't have any lacing strips to use, but I guess I'll just eyeball it with my boyfriend holding it closed for now. That should get me about as close as I could get without putting any boning in, anyway, since I'm planning on leaving a bit of a generous gap in the back. I want it to be able to handle some weight fluctuations.

Wonder what the big picture is? Well, I'm hoping to end up with a foundation garment that will work out for a Tudor and Elizabethan silhouette. For now, I'd like to avoid making anything too specific to any one set of clothes, since I don't know how much time I'll have in the future to devote to sewing, and I'm also not married to doing everything 100% historically accurately. This last point is the one I'd rather not admit; I'm not altogether confident in my abilities, and I'd rather not expend too much expense on undergarments before I've got a pattern that fits me and a method that produces reliable and sturdy results. I expect the shape I'm aiming for will be a good starting point for a Tudor or Elizabethan shape, even if it's not specific to either .

Wednesday, January 18, 2012

My Most Recent Project

Waaah, I can't seem to motivate myself to start a project, even though I feel like it would be really therapeutic right now. I find sewing to be very meditative, and I've been really anxious lately. Unfortunately, I can't find my sewing basket, and without that, I can't really start anything. I thought it was in my would-be sewing room (currently, it's storage for boxes that we haven't yet unpacked), but if it's in there, it's hiding! There's a good chance it's in my boyfriend's grandmother's garage, and I most likely won't get a chance to look for it until the weekend. I really want to make a new pattern for a corset that will give me the late Tudor/ early Elizabethan silhouette. I've decided to go the pair of bodies route, probably half boned, front and back lacing with a hint of an S-curve to support the bust. Right now, I don't even have my measuring tape; if I really wanted to, I could find some string and a yardstick and get drafting that way, but I'm just not feeling enthusiastic about it. I felt the faintest twinge of costume-enthusiasm when I saw Sherlock Holmes: A Game of Shadows the other day, but not enough to throw me into a productive tizzy. That being said, my last big project (quickie Star Trek uniforms don't count!) was a Victorian-inspired outfit for a Vampire-themed costume ball.

Unfortunately, I didn't get a chance to take really good photos of this costume; please excuse the tiny messy apartment surroundings and slap-dash photos!

I'm wearing a camisole, a corset (made for the costume), a small pillow bustle with a bit of tulle to soften the line, the striped skirt, the train, the apron, and then the bodice. I made all the pieces separately because it was a rush job and I wasn't sure if I would have to re-do a piece, or want to re-use parts and pieces for other projects. I drafted the train, bustle, apron, and skirt myself; the corset was based of of Simplicity's civil war corset (9769), and the bodice is a slightly modified version of Truly Victorian's TV442. I ended up throwing this together relatively quickly, using white and red striped silk I'd been lusting after for months. I love working with silk, especially something with a shantung/ taffeta finish like this, which was an absolute joy. I wanted to make a dinner bodice to match the skirt, but there was none left when I went back; I was lucky I bought up the fabric for the skirt when I did! I had some deep red silk velvet left over from a Regency gown that I used for the train; the apron and the bodice were of some poly blend masquerading as a silk shantung, which fit my budget, but ended up not behaving. Surprise surprise, right? Well, you get what you pay for. I had all of the accessories, including the faux-fur capelet, except for the headpiece, which I whipped up specifically for this outfit.


I'm not sure who to credit with the following photo, which I stumbled across on the interwebs. It's the only one I have of my boyfriend and I at the event; if you are the photographer, please let me know so I can credit you!

My very patient boyfriend escorting me down the stairs at the event! 

So, that was the last "big" project I did, and that was over a year ago! It's time to start something else relatively major, I just need to get organized enough to do so. It will be so nice once the spare room downstairs is cleared out and I finally have my sewing room. I painted it a dusty lavender-grey with a dark peacock blue accent wall, and I can't wait to get some inspiring artwork up on the walls, a cutting table all set up, and maybe a cork-board to tack images pertaining to my works-in-progress on. We'll see what happens with all of that; as always, settling in is a process!