Tuesday, April 24, 2012

Corset Update

Don't worry, I'm still sewing! I know it's been a little while since I've posted, and I have been taking an admittedly leisurely pace with this project, but I have been steadily moving forward with it. I have been writing about my progress much more frequently in a personal journal, and I think I thought I'd posted some of that here... Oops!

Since I wrote last, I finalized my corset draft; I decided not to add a curve to the front so that it would work for a bigger variety of outer garments, and give a more authentic flat-fronted look. I cut the corset all in one piece with the center front of the pattern on the straight of grain. I'm not wholly confident that this was the best course of action, but it's too late now. All of my shaping (what little of it there is...) is done at the center back, which is my lacing edge. I've left a bit of a gap to lace with, so that I can adjust it there if need be. However, I noticed (after cutting, of course) that by the time the pattern curves around, the back edge is on the bias.

Oops.

Anyway, I'm going to move forward with this and if it doesn't work out, then I'll use what I've learned and start again. I hate failing, but if I've learned anything, it's that sewing is a lot of trial and error. And I like to think that I'm good at learning from my mistakes!

So that's what happened with the pattern. For the fabric, I used a base of coutil, an inner layer of cotton broadcloth, and an outer layer of very lightweight blue and gold shot silk from an old skirt I had as a child. I couldn't bring myself to get rid of it when I outgrew it because the fabric was so pretty, so I've been hanging onto it for going on 12 or 13 years now! I picked it apart, and managed to get the entire corset with only one seam on it, which I placed on the center front so it wouldn't be too random. I marked the boning channels on the coutil in pencil, making up the placement as I went along (I also had a look at the Elizabethan Costuming Site's corset page). Then, I hand basted all three layers together around the edges, and sewed the boning channels on my machine from top to bottom. For some reason, the silk layer now looks shorter on the center front than the other layers, but the shifting was otherwise minimal. I had to clip the basting threads at the bottom as I went because of the shifting, and I think it helped, but it did not solve the problem completely. I haven't decided yet if I am going to trim the bottom point to meet the silk, or if I am going to try to cover up the gap with bias tape, since that layer is merely cosmetic; the boning will go between the coutil and the cotton.

Speaking of boning, I think I may try to use cable ties to bone this corset. I've only ever used steel, Rigilene and featherweight boning before. But I hate having to mail order steel, I hate that you can't order it in half inch measures, and I hate trying to cut it and finish the ends. If cable ties work, that would be a great solution, since they're easily accessible, easily cut, and inexpensive. Well, we'll see. I am fickle; I may end up using steel after all.

Here's what I've got so far:


There's all of my leftover steel bones from past projects; of course, there's only about four that would actually work for this corset. Isn't that how it always goes? You can also see the bit of white fabric on the bottom from where the upper layer shifted. As of yet, it is strapless, but I plan on making straps separately that can be laced on, if I decide they'd help with the fit or comfort. It has tabs as well, but I haven't cut them yet; the boning will run the length of the tabs. 

As for my next project... I found an old farthingale that I started a few years (and a few pounds...) ago. It's put together and the channels for the hoops are pinned on, but not sewn down. However, if I want to make this work, I'll have to add a bi to the waist so it won't be uncomfortable. It fits now, but just barely, and I don't know about over a corset... It also looks like it's too short! I don't think I've gotten taller, but I wonder if I was being overly cautious the first time around about giving myself enough clearance to walk in it comfortably. I may have to add a band at the bottom with another hoop and some pleats. 

I can't wait to finally have a finished, wearable garment to show you guys! 

Wednesday, April 11, 2012

Bits and Bobs

Hi guys!

I guess I don't have any "real" progress today, but I've been enjoying blogging about my sewing, as I feel like it helps motivate me. I can feel my creative side unfurling as I focus on this one project, and other projects seem to be coming together as well. For instance, I'm not feeling so hopeless about school anymore, even though the timeline I'm looking at isn't making me happy. In addition, I'm also starting to get some good ideas for my house!

Some of you may know that my boyfriend and I moved into a house together in October. Neither one of us has ever had our own home in our adult lives; we've both gone from apartment to apartment, moving every year or two. Getting settled in to something bigger than a shoebox is a little bit different, and a little bit chaotic, but definitely in a good way. However, we're coming up on six months in the house, and while we've made great strides in that time, the unpacking and pretty-ifying slowed way down when we had guests here throughout the holidays, and hasn't really picked up again. It's been difficult to find all of the things that we need, as we still have so many unpacked boxes, and our hall closet, half our garage, my soon-to-be sewing room, and his grandmother's garage are all cluttered with bags and boxes from the move. I wouldn't say I feel guilty about the clutter, per se, but I am anxious to see some tangible movement in the house again. Where am I going with this? What does this have to do with my sewing project?

Well, two things, really. The first being we went over to his grandmother's house yesterday, and I found a ton of fabric and notions. Very exciting! I found a big box of boning and ribbon and other odds and ends from Lacis, in addition to plastic bins full of fabric. I even found an entire gown that had gone missing! It was originally a Vintage Vogue pattern (1931, I want to say?) I threw together in high school after my sewing teacher gave me the cut pieces, and that was last worn in 2008 or 2009 to a Firefly-themed event. My other big find was a length of green fabric that I've been missing for around 7 years now! I had used it as a sash on my windows when I first got it, and after I changed my curtains it mysteriously disappeared. Mystery solved; it had been hiding out in a box in my dad's storage unit that he passed along to me in my last move without me really realizing what was in it. It's a bright kelly green, and I'd been hoping to find it to use with some brown velvet I have to make an early Tudor. However, now that I see it again, I think it may be TOO bright. However, it claims to be silk; I'll have to double check (if it is silk, it's a weave I don't recognize; papery, but lacking the luster crinkle that taffeta has; thicker than a crepe de chine), but if it is, it should be fairly easy to dye.

The other reason I bring up the house is that all of this sewing has opened up the creative floodgates for decorating the house, too. Right now I am obsessed with putting in a floor-to-ceiling bookshelf in the office, along with a rolly library ladder. We have high, sloped ceilings, and I think tall bookshelves would be gorgeous and dramatic; I'm going for a whimsical-fussy look in there, with a bit of an Asian-obsessed-Victorian feel. My boyfriend is a Buddhist, and has a small altar set up in there. I don't want to detract from his love of Asian-inspired furniture, but I think it would marry beautifully with the Victorian aesthetic I'm picturing. Whistler's Peacock Room, anyone? If I could find a lush Persian rug in a deep pine green to compliment the current taupe and peacock green walls, I'd be in heaven. My other current obsession for the house is Cole & Sons Woods wallpaper. Our great room is a warm taupe grey that leans dusty lavender in warmer light, and although it's a beautiful color, the room is a bit plain. I'm trying to gradually incorporate pops of red into the space, and originally thought that painting a small inset wall behind our dining room table red would be nice. It would be beautiful, but perhaps too bold for my boyfriend's taste. Lately, I've been thinking that keeping it monochromatic by putting Woods on that wall might be a way to bring some humor into the space without detracting from the "elegant" look we've been favoring.

None of this is going to happen right away, but it's fun to think about these things; hopefully by the time we have a little bit of extra money to throw at these things, we'll know exactly what we want and be able to spend it wisely on a few key elements to breathe a bit of strong personality into the space.

As for the corset... I cut it out of some cheap canvas, only to discover it doesn't hold in the side-boobs the way it should after it squishes them from the front. I was thinking after yesterday's post that I never thought I'd find myself talking so much about my breasts on the internet... Oh well, c'est la vie, and it's a bit of a necessity if I want to blog honestly about the process of developing a corset pattern. I feel like everyone else takes some measurements, drafts a pattern, makes a minor adjustment or two, and voila! There's a corset. That hasn't been my experience with it, but I'm not complaining. I actually quite enjoy the process! Wish me luck; if all goes as planned, in the next week or so I should have a corset finished enough that I can try it on and take a few pictures! My goal is to finish the pattern today, and start putting it together tomorrow so that I can place an order for corset steel before the weekend. Then I can move on to working on the smock or farthingale while I wait for those last supplies to arrive. Good plan, right? We'll see what actually happens...

Tuesday, April 10, 2012

Drafting Success!

I drafted a corset pattern that I think will work for me! After holding multiple paperboard patterns up to myself and shaving off corners and building up curves, I've finally got something that looks like it will be a good fit. However, before I make a mock-up, I have to decide if I want to add a bit of a curve to the front to support my bust. Originally I took for granted that I would do this, but as I was holding a piece of rather stiff paperboard up to myself, it occurred to me that I may not have to sacrifice the Tudor-style flat front for support. I have had luck with lacing myself very tightly into flat-front bodices before, although I will admit I often had to re-adjust the Ladies on the sly a couple of times throughout the day. A bit of a dip beneath the bust would probably help avoid this problem, but I am concerned about not have as "accurate" a silhouette, and about having to match that curve on every gown I make from here on out to wear over this foundation garment. That being said, there is evidence of a bit of shaping around the bust in the period I am immediately focusing on (1530's-1540's), at least in Holbein's work. And I don't know why, but I trust him more than other painters of the period; he seems to pay more attention to portraying things as they were, rather than in an idealized manner. His attention to detail leads me to believe that this shaping around the bust is accurate to how the clothing fits, although this is all purely speculation. It doesn't *really* tell us anything, other than that he painted women this way.

FYI, I don't own any of these portraits; I've found them online. These are all by Hans Holbein.

Jane Seymour: See the shading around the bust and the curve at the side of the bodice? 

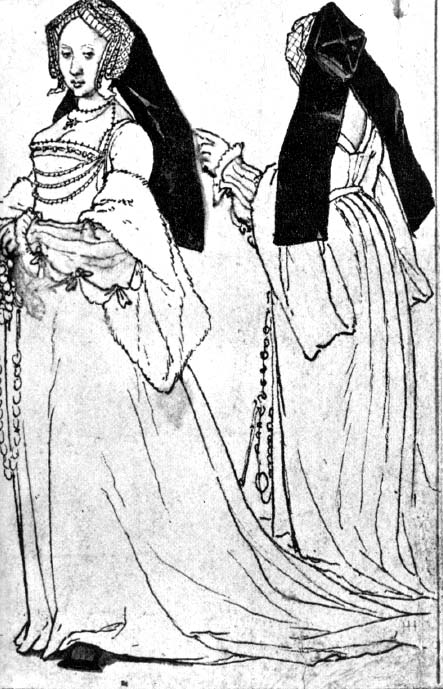
Another curve at the bust, courtesy of Holbein 
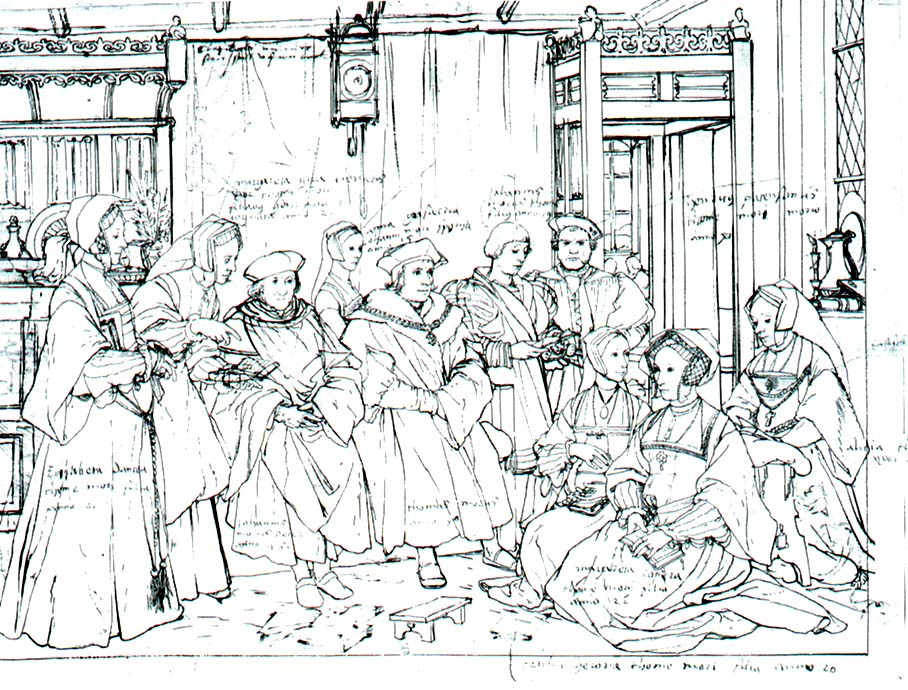
Sketch of Thomas More's Family: Check out the women on the right


This one doesn't show the garment following the curve of the bust, but it does show some major cleavage and a lower neckline, which is helpful in its own right; boobs acted the same when compressed then as they do now! Because I'm telling you, there's no way you're putting me in a tight, flat-front corset and getting demure Anne Boleyn decolletage 
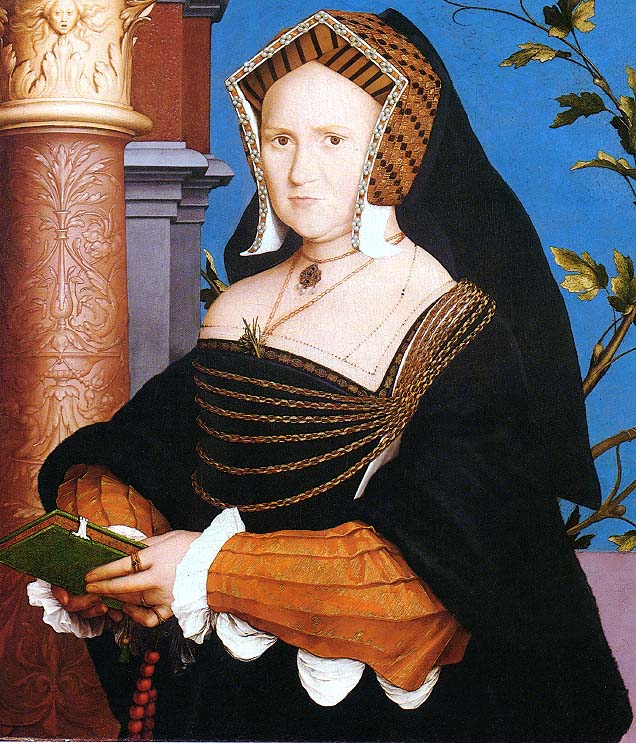
Lady Guildford: More evidence that the ample cleavage produced by a flat-front bodice is natural and not entirely "non-period". Although I'm still against the Ren-Faire bodice "affected" cleavage effect. 

Maybe I am getting too caught up on the "accurate silhouette" part of things; in fact, in lots of Holbein's work from the 1530's, you'll see shading and highlighting suggesting a swell for the bust, and 3/4 profile works often demonstrate a dip between the swell of the belly and swell of the breasts, especially on non-Royal sitters and fuller figured women (take a look at the images above). It's hard to say whether this is because a pair of bodies was fitted to the wearer's shape, or because there was no foundation garment at this point in time, and the stiffened bodice was not enough to rigidly re-shape the sitter's curves. At any rate, I hope to make this "catch-all" corset (it's not really accurate to any of the existing pairs of bodies we have from the end of the sixteenth century, much less any of the speculative foundation garments that are considered most likely for the Henrician period) work all the way up through the 1570's, and that bosomy swell tends to disappear from portraits around the 1540's, as far as I can tell. Looking at these grouped together, I tend to think that women who were wearing highly stiffened bodices ended up with a flat fronted bodices and compressed bosoms that moved upwards, producing cleavage, and that the women with the curvier fronts that we see are not wearing any sort of highly stiffened foundation garments, just a couple of thick layers of fabric for their kirtle and gown.

So, where does this leave me? I think I may try mocking up a flat-front corset and seeing if that is feasible; I can't stand the idea of having a fold under my bust on gowns with no center front shaping seam, and I really want to be able to use this corset for more than just the one gown I am making along with it. That being said, if I don't have luck with that design, I don't think I will feel guilty if I add a little bit of an inward curve to bring the corset back against the rib cage beneath the bust to help support it.

What do you guys think? Anyone out there tried this? By the way, I should probably add that I am working with Sempstress' Curved Front Corset as my model for the curved front I have been referring to. She seems to have had very flattering, comfortable results with it.

Sunday, April 8, 2012

Back to Drafting!

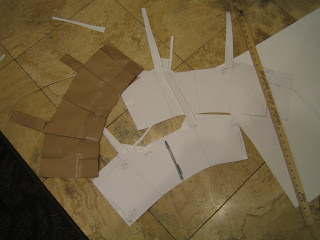
This is what my living room floor looks like right now:


I'm back at it! Boy, it's been a few years since I've done any major pattern drafting... I am out of practice! Unfortunately, I'm also out of practice taking my measurements, so this has taken a bit more adjusting than I remember! Some of the problem is that I am also paranoid about making a corset that doesn't leave scabs on my hips. Been there, done that... I'd rather avoid it this time around if I can.

I've learned a few surprising things about my body through this process. Specifically, that it does not look the way I think it looks. For instance, I knew I had a high waist, but seriously? Seriously? That is a SHORT pattern. Also, putting my bust point on the pattern where I "should" (read: where I measured it) left me with a way-too-low-even-for-a-basic-pattern-block neckline. Is this a sign that I need to get a better bra? Well, I already knew that...

It's always amazing to me that you can take a few measurements and just draw yourself something that fits your body. I'm not particularly good at math, so maybe that's where some of the mysticism comes in. Obviously, I can find my way around basic geometry (otherwise I wouldn't be able to do this at all), but it's still a bit of a mystery to me how it works; I just follow the directions and figure it out as I go. Incidentally, if you'd like to figure out how to make your very own basic conic block as a starting point for a Tudor corset pattern, I highly recommend Sempstress' instructions. This website has been invaluable for drafting basic Tudor pieces.

Just FYI, in the photograph above, the paper bag was my starting point, the middle piece represents the block after a few changes were made, and the bottom pattern is what I am actually planning on altering into something of a corset shape (add tabs, adjust the straps, reduce the bust), cutting out, and trying on. Darn it, I don't have any lacing strips to use, but I guess I'll just eyeball it with my boyfriend holding it closed for now. That should get me about as close as I could get without putting any boning in, anyway, since I'm planning on leaving a bit of a generous gap in the back. I want it to be able to handle some weight fluctuations.

Wonder what the big picture is? Well, I'm hoping to end up with a foundation garment that will work out for a Tudor and Elizabethan silhouette. For now, I'd like to avoid making anything too specific to any one set of clothes, since I don't know how much time I'll have in the future to devote to sewing, and I'm also not married to doing everything 100% historically accurately. This last point is the one I'd rather not admit; I'm not altogether confident in my abilities, and I'd rather not expend too much expense on undergarments before I've got a pattern that fits me and a method that produces reliable and sturdy results. I expect the shape I'm aiming for will be a good starting point for a Tudor or Elizabethan shape, even if it's not specific to either .